Wednesday, November 21, 2012

Merrily We Roll Along

Guess who started rolling!  Little One is now 3 months old and rolling from her belly to her back.  She's so close to going the other way but it seems like her arm gets in the way all the time.


Future Olympic tumbler right there.

Tuesday, November 20, 2012

Pumpkin Frozen Yogurt

It's that time of year when pumpkin can be found everywhere.  And I'm quite OK with that.  I love pumpkin and saw this pumpkin frozen yogurt recipe on Pinterest.


Do you have four ingredients?  What?  That's it?  Gotta try it...


So here it is...slightly adapted:


Pumpkin Frozen Yogurt

15 oz can pureed pumpkin
2 cups low fat vanilla yogurt
1 tablespoon sugar
1 teaspoon pumpkin pie spice


Mix all ingredients well.  Pour into ice cream maker and let run for about 5 minutes.  Remove and enjoy.  Store any leftovers in the freezer.


Add whatever toppings you like.  Whipped cream makes it feel more pumpkin pie-y (if that's a word).  Chopped nuts, chocolate chips, and pieces of pie crust would be other good toppings.


Wednesday, November 14, 2012

My Favorite Blogs

Though I'm not so great at being consistent about writing on my own blog, I have a few blogs that I love to read.  Check them out!

Nice Girl Notes

www.nicegirlnotes.com

-- A lifestyle blog about a mom with three adorable girls.  This blog is hilarious and touches on topics ranging from childhood memories to getting preschoolers to do chores.  My favorite blog post is a storytelling post about her brother.  And pretty much everything else on her "Best Of" page.


Elle Apparel

www.elleapparel.com

-- I like this blog because of the awesome tutorials and the ideas for sewing projects.  I'm not the greatest at decorating and fashion (though I like pretending I am) and this blog has some great ideas for both.  My favorite post is the tutorial for making a t-shirt dress.


How Sweet It Is

http://www.howsweeteats.com/

-- This blog features some of the most delicious and creative recipes ever.  Some of them are a little out there for my tastes but most of them make me fatter just looking at them.  My cake batter bark post is based on her recipe.  I've been eyeing up her chocolate fudge peanut butter cake and need an excuse to try it...among others.  :)


MADE


www.danamadeit.com

-- I love this blog for all the tutorials on kids clothes.  They are so cute!  When I get some time I'm going to whip up some circle skirts for Little One.

Monday, November 12, 2012

Photographing Baby

So I have been drastically ignoring this blog.  It's been just over a year since I last posted....*hides face in shame*

What has happened in this past year?  Nothing major...only a baby, an inter-state move, and new jobs for the hubby and I.  No biggie.

Anyway, this is the Little One:

3 months old!

She was born August 11 and has taken us on quite a trip through new parenthood (which isn't even close to being over yet).


Little One turned 3 months old yesterday.  I've planned to get her photos done at 0, 3, 6 and 12 months.  I spent way too much on her photos at 9 days old, primarily because I wanted somebody to come to me to take the pictures as I couldn't drive yet and Daddy had had his new job for a week and couldn't take time off yet.

So as the 3 month marker approached I was thinking about what to do in the back of my head.  I decided to give it a go myself and if the pictures didn't turn out then I would have only wasted a little bit of time.  I'm happy to say that I think the pictures turned out great (you're free to disagree).  And even better my Shutterfly order of prints came to $12.  Compared to the $70 I spent before....who wouldn't love that?  Here's how I did it.

First I read some photo tips on the Internet and checked out some ideas on Pinterest.  I ended up not really using any of those cute ideas mainly because I didn't want to spend the time gathering up all the supplies or because I didn't have comparable item(s).

Next I waited until Little One was in a good mood.  I changed her diaper and undressed her all in one shot and she was ready to go.  You may want to dress your baby or use some cute props.  In these Little One is wearing a simple white flower headband.  Things like headbands, hats, diaper covers, and onesies are all good props.  Avoid using things with writing as that will take attention away from your adorable baby.  If you want a full body shot I'd recommend some kind of diaper cover, cloth diaper, or clothing.  The shots with her disposable diaper in them just looked weird to me.  Or if you're brave you can let baby go commando.  Good luck with that.

I used the room with the best light in our apartment (none of them get good light at all).  That room hapens to have a bed in it so I was able to prop stuff up on the bed.  I used bed pillows to position her and large pieces of cloth as backdrops.

My large pieces of cloth were bought on sale last week at JoAnn fabrics for the purpose of making dress up clothes in the future.  However the satin and lace really gave the photos a nice look.  You could really use anything...a sheet, afghan, comforter, etc.  Just make sure it's a decent size and is clean enough to put your baby on it.

Basically position your pillow(s), drape your cloth over them, position baby on top, and snap away.  Take as many pictures as you can.  A lot of mine came out blurry because of the wriggling baby.  She also had a short span of toleration for this activity.  If your baby wants to be held you can get a helper to take the place of the pillows, drape the cloth over them, and have them hold baby in place.  A helper would be nice to help get baby smiling, but I managed this photo by myself.  And in only about 15 minutes too.

Try a number of different backdrops.  It's hard to know how they'll look until you blow them up on your computer.  I tried to use solids or simple patterns because I wanted the focus to be on the baby rather than on the things around her.

I thought that the purple backdrop (though it looks rather blue in this shot) made her skin look a little too blue.


The pink one was ok...I still thought the skin tone looked off.


I liked the purple with the lace over it best.


I also used the bedspread and wall as a backdrop.


I also brought out a baby blanket and draped her with it.


In this one my hand is actually underneath the blanket holding her foot at the angle I wanted.  And more importantly, holding it still.


You could also add in toys or stuffed animals.  I tried to keep it simple but there are loads of possibilities!

Sunday, October 30, 2011

All Bark and No Bite

I love trying new recipes.  I especially like quick and easy ones.  This one is especially quick and easy.

Cake Batter Chocolate Bark

What does that mean?  Think chocolate bark.  Maybe you've had it before?  Raisins or nuts mixed with milk or dark chocolate is probably the most common variety.  Or maybe you've had white chocolate with some crushed candy canes mixed in (perfect for Christmas).  Now think cake batter.  Ever had cake batter ice cream?  Like that.  Mix the two together and you get Cake Batter Chocolate Bark.

I found this fantastic idea on How Sweet It Is.  It was super easy to make and took about 30 minutes to whip up (including clean up time).  Also, it only had 4 ingredients.

You can go here to get the recipe.  It's very simple and easy to follow.  You'll need:

White chocolate & dark chocolate melting chocolate wafers (you should probably taste a few just to make sure the chocolate is safe to use).


Sprinkles


Cake mix


Melt the chocolate & spread it on a cookie sheet.  First the dark...


Then the white...


But mix the cake mix into the white chocolate before you spread it on the dark chocolate.


Then sprinkle away!


Once cooled, break into pieces.


For some reason all my dark chocolate separated from the white chocolate when I broke it up.  I followed the recipe instructions to put the chocolate in the freezer between layers but maybe it was too cold?  Or maybe I didn't spread it thinly enough.  In any case it's still chocolate.  And it's still delicious.  Maybe you could try mixing the sprinkles into the white chocolate too as a lot of them fell off as I was breaking the bark up.  My counter looked like the murder scene of a clown.  Seriously.


In any case, this is delicious.  And highly recommended.  If you know how to keep your chocolate in one piece let me know in the comments!

Wednesday, October 26, 2011

Perfect Pillowcases

The easiest (and probably most used) sewing project I have ever done has been making a pillowcases.  Or should I say pillowcases as I've made many many of them.  They're so easy!  Can you sew three straight seams?  Then you can make a pillowcase.  And it will be way cooler than any other plain, solid colored, boring pillowcase that came with your plain, solid colored, boring sheets.

When my husband and I got married a year ago I made a quilt for our bed.  Since then I've been meaning to make some pillowcases to match but kept having other more interesting things come up.  But this weekend I decided to just do it.  So I did.  They turned out pretty awesome.


I also tried my hand at making decorative throw pillows.  They turned out better than expected.


So after looking at these you're probably thinking to yourself, "Wow, those are awesome!  I want to make some!"  Good.  You've come to the right place.


SIMPLE PILLOWCASE

I'll start with the easy pillowcase.  You will need the following:
-- 3/4 yard of main color fabric
-- 1/4 yard of accent color fabric
-- spool & bobbin of matching thread
-- cutting mat, straightedge, and rotary cutter (or other means of trimming/straightening your fabric)
-- iron/ironing board
-- straight pins

Recommended fabrics are cotton and flannel.

Sometimes when they cut your fabric off the bolt at the fabric store it doesn't turn out square.  To be certain you have enough fabric get a little extra.  By "a little extra" I mean about an extra 4 inches or so (that would be 7/8 and 3/8 yard for the main and accent colors respectively).


Step 1: Boring Pre-Craft Preparations

You should wash (read: pre-shrink) your fabric before cutting it out.  This step isn't absolutely necessary but it guarantees that your fabric won't shrink after you sew your magnificent pillowcase.  Often this process unravels the edges of the fabric so you'll probably be thankful for getting the extra few inches.


Next you should iron your fabric to get all the wrinkles out.


Step 2: Cutting the Fabric

Now you need to cut your fabric to size.  I made pillowcases for standard size pillows and cut the main color piece to 42 inches by 26 inches and the accent color to 42 inches by 9 inches.  Your fabric is probably 42 inches from selvage to selvage (aka the uncut part that doesn't unravel on either side of your fabric).  If it's 43 or 41 inches, don't worry.  It will all be OK.  I promise.

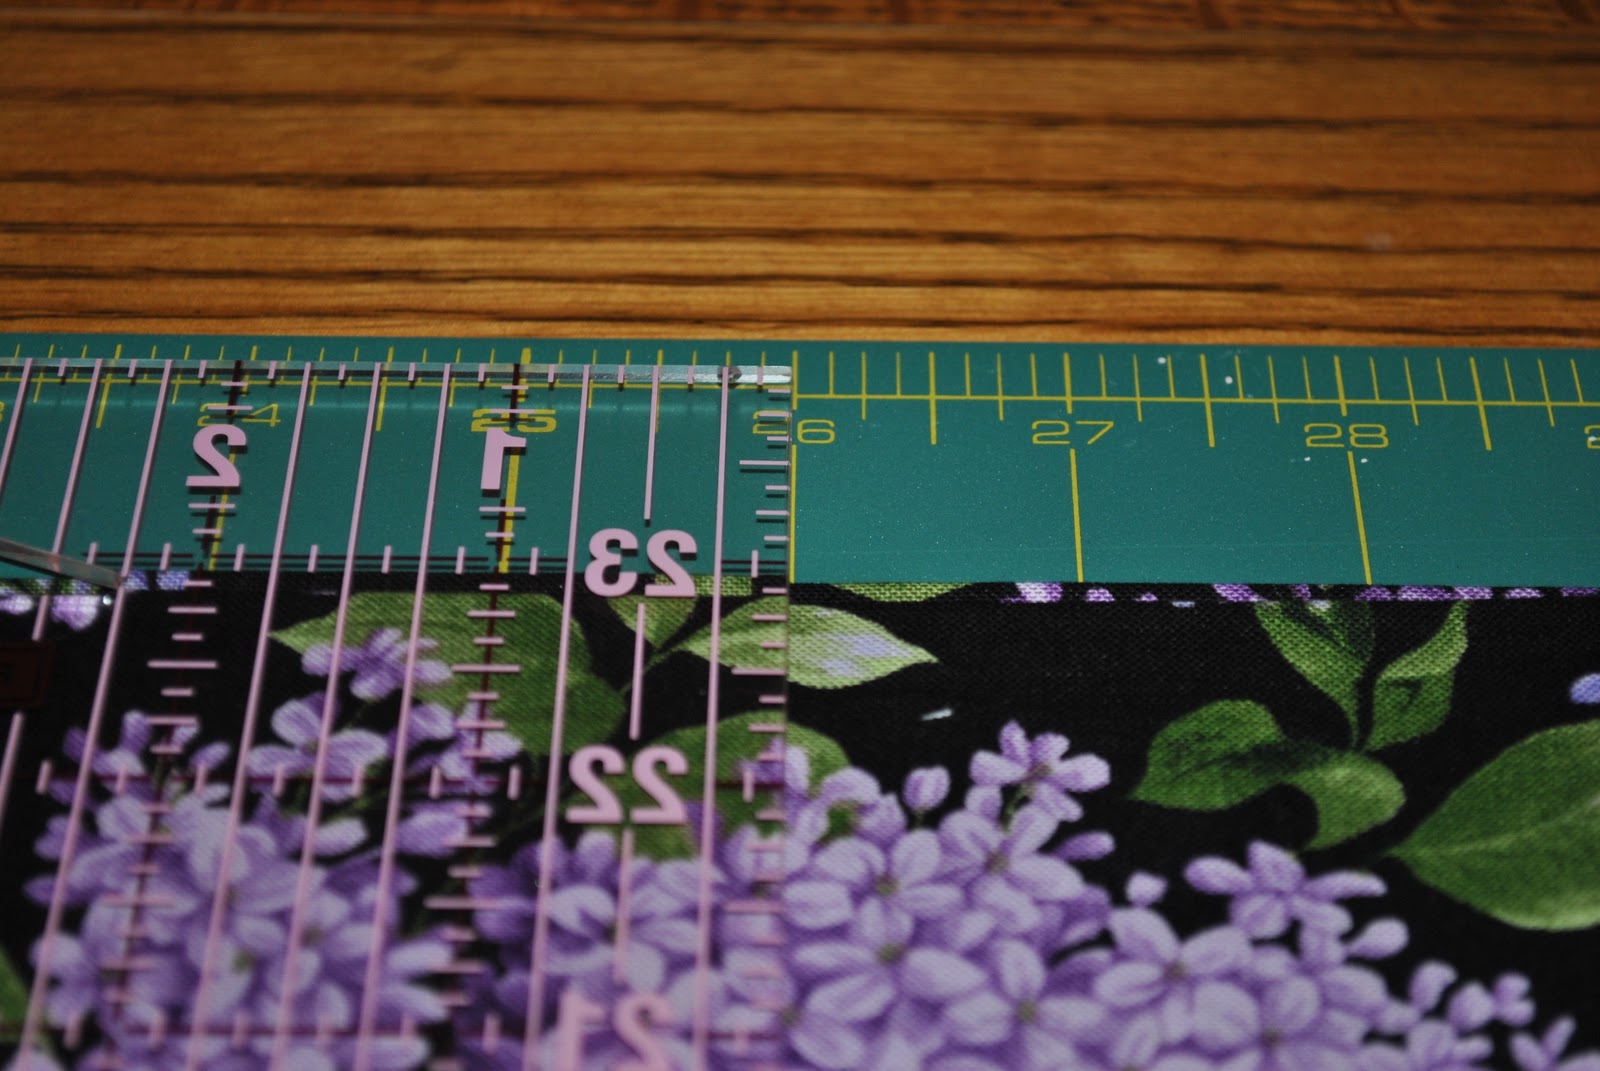
To make your cuts, fold your piece of main color fabric in half, matching up your selvage edges.  Line up your fabric on your cutting mat with the selvage edge along a line.  The sides which are unraveling are probably not quite even.  Even them up by lining them up with lines on the mat.  I lined them up and evened them off at the edge.


You will need to make your fabric 26 inches wide.  Fin the 26 inches mark on your mat and line up your straightedge.  Make sure it lines up at the bottom....


...and at the top.


Now run your rotary cutter along the straightedge to make a nice, neat, straight cut.


Yay!  Your fabric is now 26 inches wide!  Next you need to cut your accent color fabric.  Use the same method as you just did with the main color fabric but cut it 9 inches wide.  Line the fabric up and even it off first.


Then cut it so it's 9 inches wide.


Good job!


Step 3: Sew the Pieces Together

Fold your accent fabric piece in half raw edge to raw edge (the edges that want to unravel which you should have just trimmed up).  Your folded piece will be 4.5 inches by 42 inches.  Match up the corners neatly.  You should have a really long, narrow rectangle of double thick fabric.


Next match the accent piece to a raw edge of the main color piece.  They should be about the same length.  Make sure that you pin it to the right side of the main color fabric (the side you want to see when the pillowcase is done).  Pin in place.


The selvage edges should match up.


Next sew along the raw edge.  Leave a 1/2 inch seam allowance.  Backstitch at the beginning and end of the seam to secure it.


Don't forget to remove your pins BEFORE the presser foot runs over them!


Once you have completed your seam (1 down, two more to go), press open the seam with your iron.


One side of the pressed open seam - the side of the accent color fabric - should have a double thickness (see picture below).


Step 4:  Sew the Pillowcase Seams

Match up the selvage edges (trim them so they're even if necessary) and pin into place.  Make sure that the seam you just sewed lines up.


Sew along the side you just pinned (it should match the above picture).  The seam allowance should again be 1/2 inch and don't forget to backstitch at the beginning and end of the seam.  The backstitch part is particularly important in this step.

At this point you should have a tube.  Pin up the end of the tube that doesn't have the accent fabric.  Sew another seam along this edge with a 1/2 inch seam allowance, backstitching at the beginning and the end.


Step 5: Finish the pillowcase

Trim the hanging threads and then turn the pillowcase inside out.  Push out the corners as shown.  Put one hand inside a corner.  Hold the outside with your other hand.


Push out with the hand that's inside the pillowcase so that the corner is crisper.


Iron if you so desire and then put it on a pillow!  Congratulations, you made a pillowcase!  Have your cat help you model them on your bed.


DECORATIVE STRIPY PILLOWCASE

This one is for the more adventuresome.  You will need the following.

-- Strips of fabric in a few coordinating prints; the amount will depend on how wide you want your stripes
-- spool & bobbin of matching thread
-- cutting mat, straightedge, and rotary cutter (or other means of trimming/straightening your fabric)
-- iron/ironing board
-- straight pins

I used cotton fabric but you could use flannel or even a decor fabric if you're feeling extra adventuresome.


Step 1: Cut Fabric into Strips

You'll need to cut your fabric into strips (or calculate how much fabric to purchase).  Math time!  (You never thought word problems could be applied to crafts, did you?)  Your strips will need to be sewn together to be about 29 or 30 inches wide.  If you want 4 stripes they'll each be about 7.5 inches wide each  and you'll need to add an extra inch for the seam allowance so you'll cut your four strips 8.5 inches wide.  If you want more stripes or stripes of varying widths calculate accordingly (remembering to add 1 inch to the width of each strip for the seam allowance).

Step 2: Sew the Strips Together

Sew the strips together in whatever order you like, backstitching at the beginning and end of each seam and leaving a 1/2 inch seam allowance.


Step 3: Press the Seams Open

This will take a little bit since there are probably a lot of seams.


Step 4: Finish Selvage Edges

The edges of all the strips probably won't be even.  Fold over so that the shortest piece has been folded over about 1/2 inch.  Iron in place.


Then sew a seam along the folded over edge.  I used a fancy stitch on my sewing machine.  If you use a straight stitch sew it about 1/4 inch from the edge.


I really like the way this finished edge turned out.


Step 5: Sew Side Seams

You want these edges to end up on the back of your pillow.  Fold the two finished edges to the middle of the "back" of the pillowcase.  Instead of being folded in half with the edges along the edge of the rectangle formed by the fabric, the edges should be in the middle.  I hope this makes sense as I didn't get a good picture.  Overlaps the edges a little bit (about 1.5 or 2 inches) and line up the raw edges of the sides.  This picture shows the overlap.


Pin the edges.


Sew seams along the sides with a 1/2 inch seam allowance.  Then turn right side out.  The finished edges should overlap a little bit.


Put the pillowcases on your pillows and enjoy!


This picture shows how the opening should be a "slit" across the back of the pillow in approximately the middle of the pillowcase.


You could do all sorts of things to spruce these pillows up.  Here's a few ideas:
-- put buttons as decorative closures to close the back of the fancy pillowcase
-- embroider your name on the accent part of the simple pillowcase
-- stitch a fancy, decorative stitch along the edge of the accent part of the simple pillowcase
-- make the stripes go the other way on the decorative pillowcase
What ideas do you have to make these more interesting?